 # labelme: Image Polygonal Annotation with Python
[](https://pypi.python.org/pypi/labelme)
[](https://pypi.org/project/labelme)
[](https://travis-ci.org/wkentaro/labelme)
[](https://hub.docker.com/r/wkentaro/labelme)
Labelme is a graphical image annotation tool inspired by .
It is written in Python and uses Qt for its graphical interface.
# labelme: Image Polygonal Annotation with Python
[](https://pypi.python.org/pypi/labelme)
[](https://pypi.org/project/labelme)
[](https://travis-ci.org/wkentaro/labelme)
[](https://hub.docker.com/r/wkentaro/labelme)
Labelme is a graphical image annotation tool inspired by .
It is written in Python and uses Qt for its graphical interface.
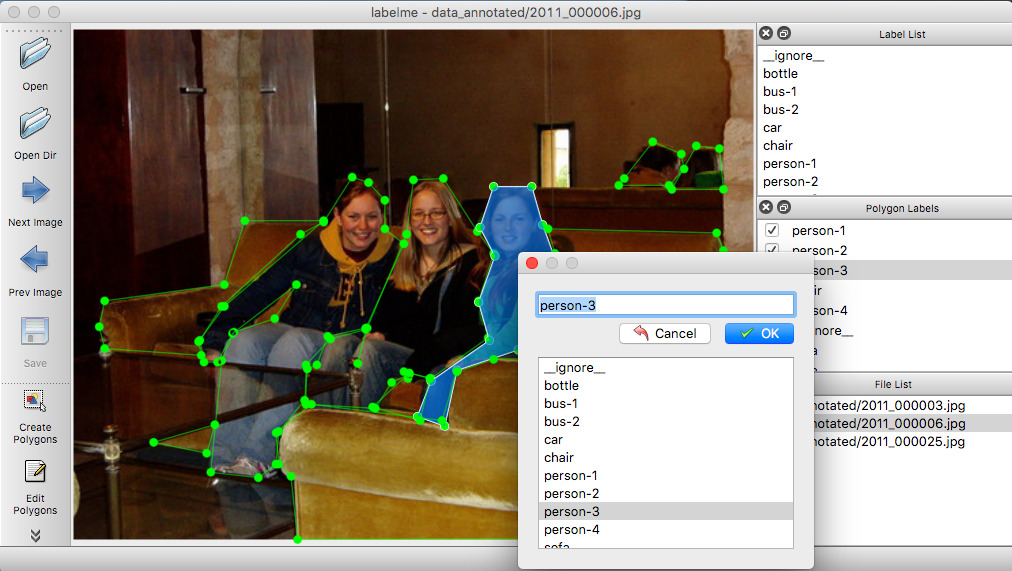 Fig 1. Annotation example of instance segmentation.
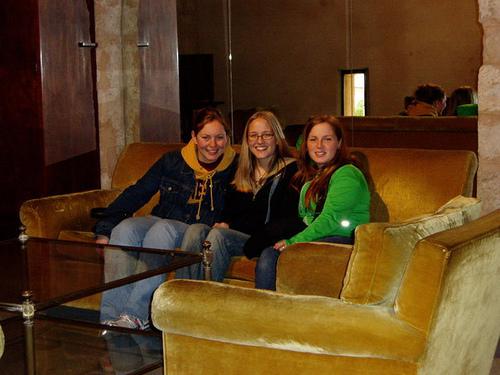

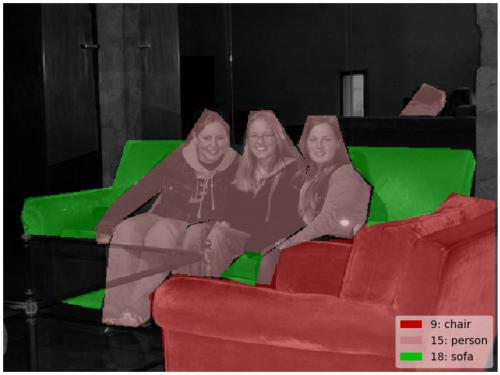
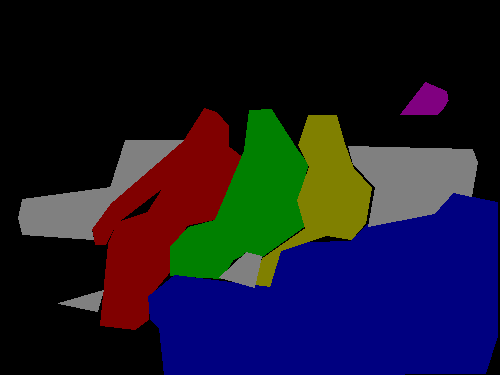
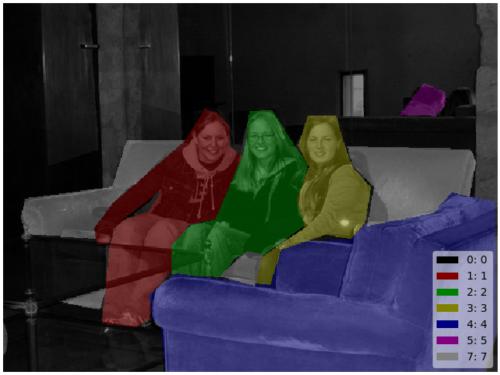 Fig 2. VOC dataset example of instance segmentation.

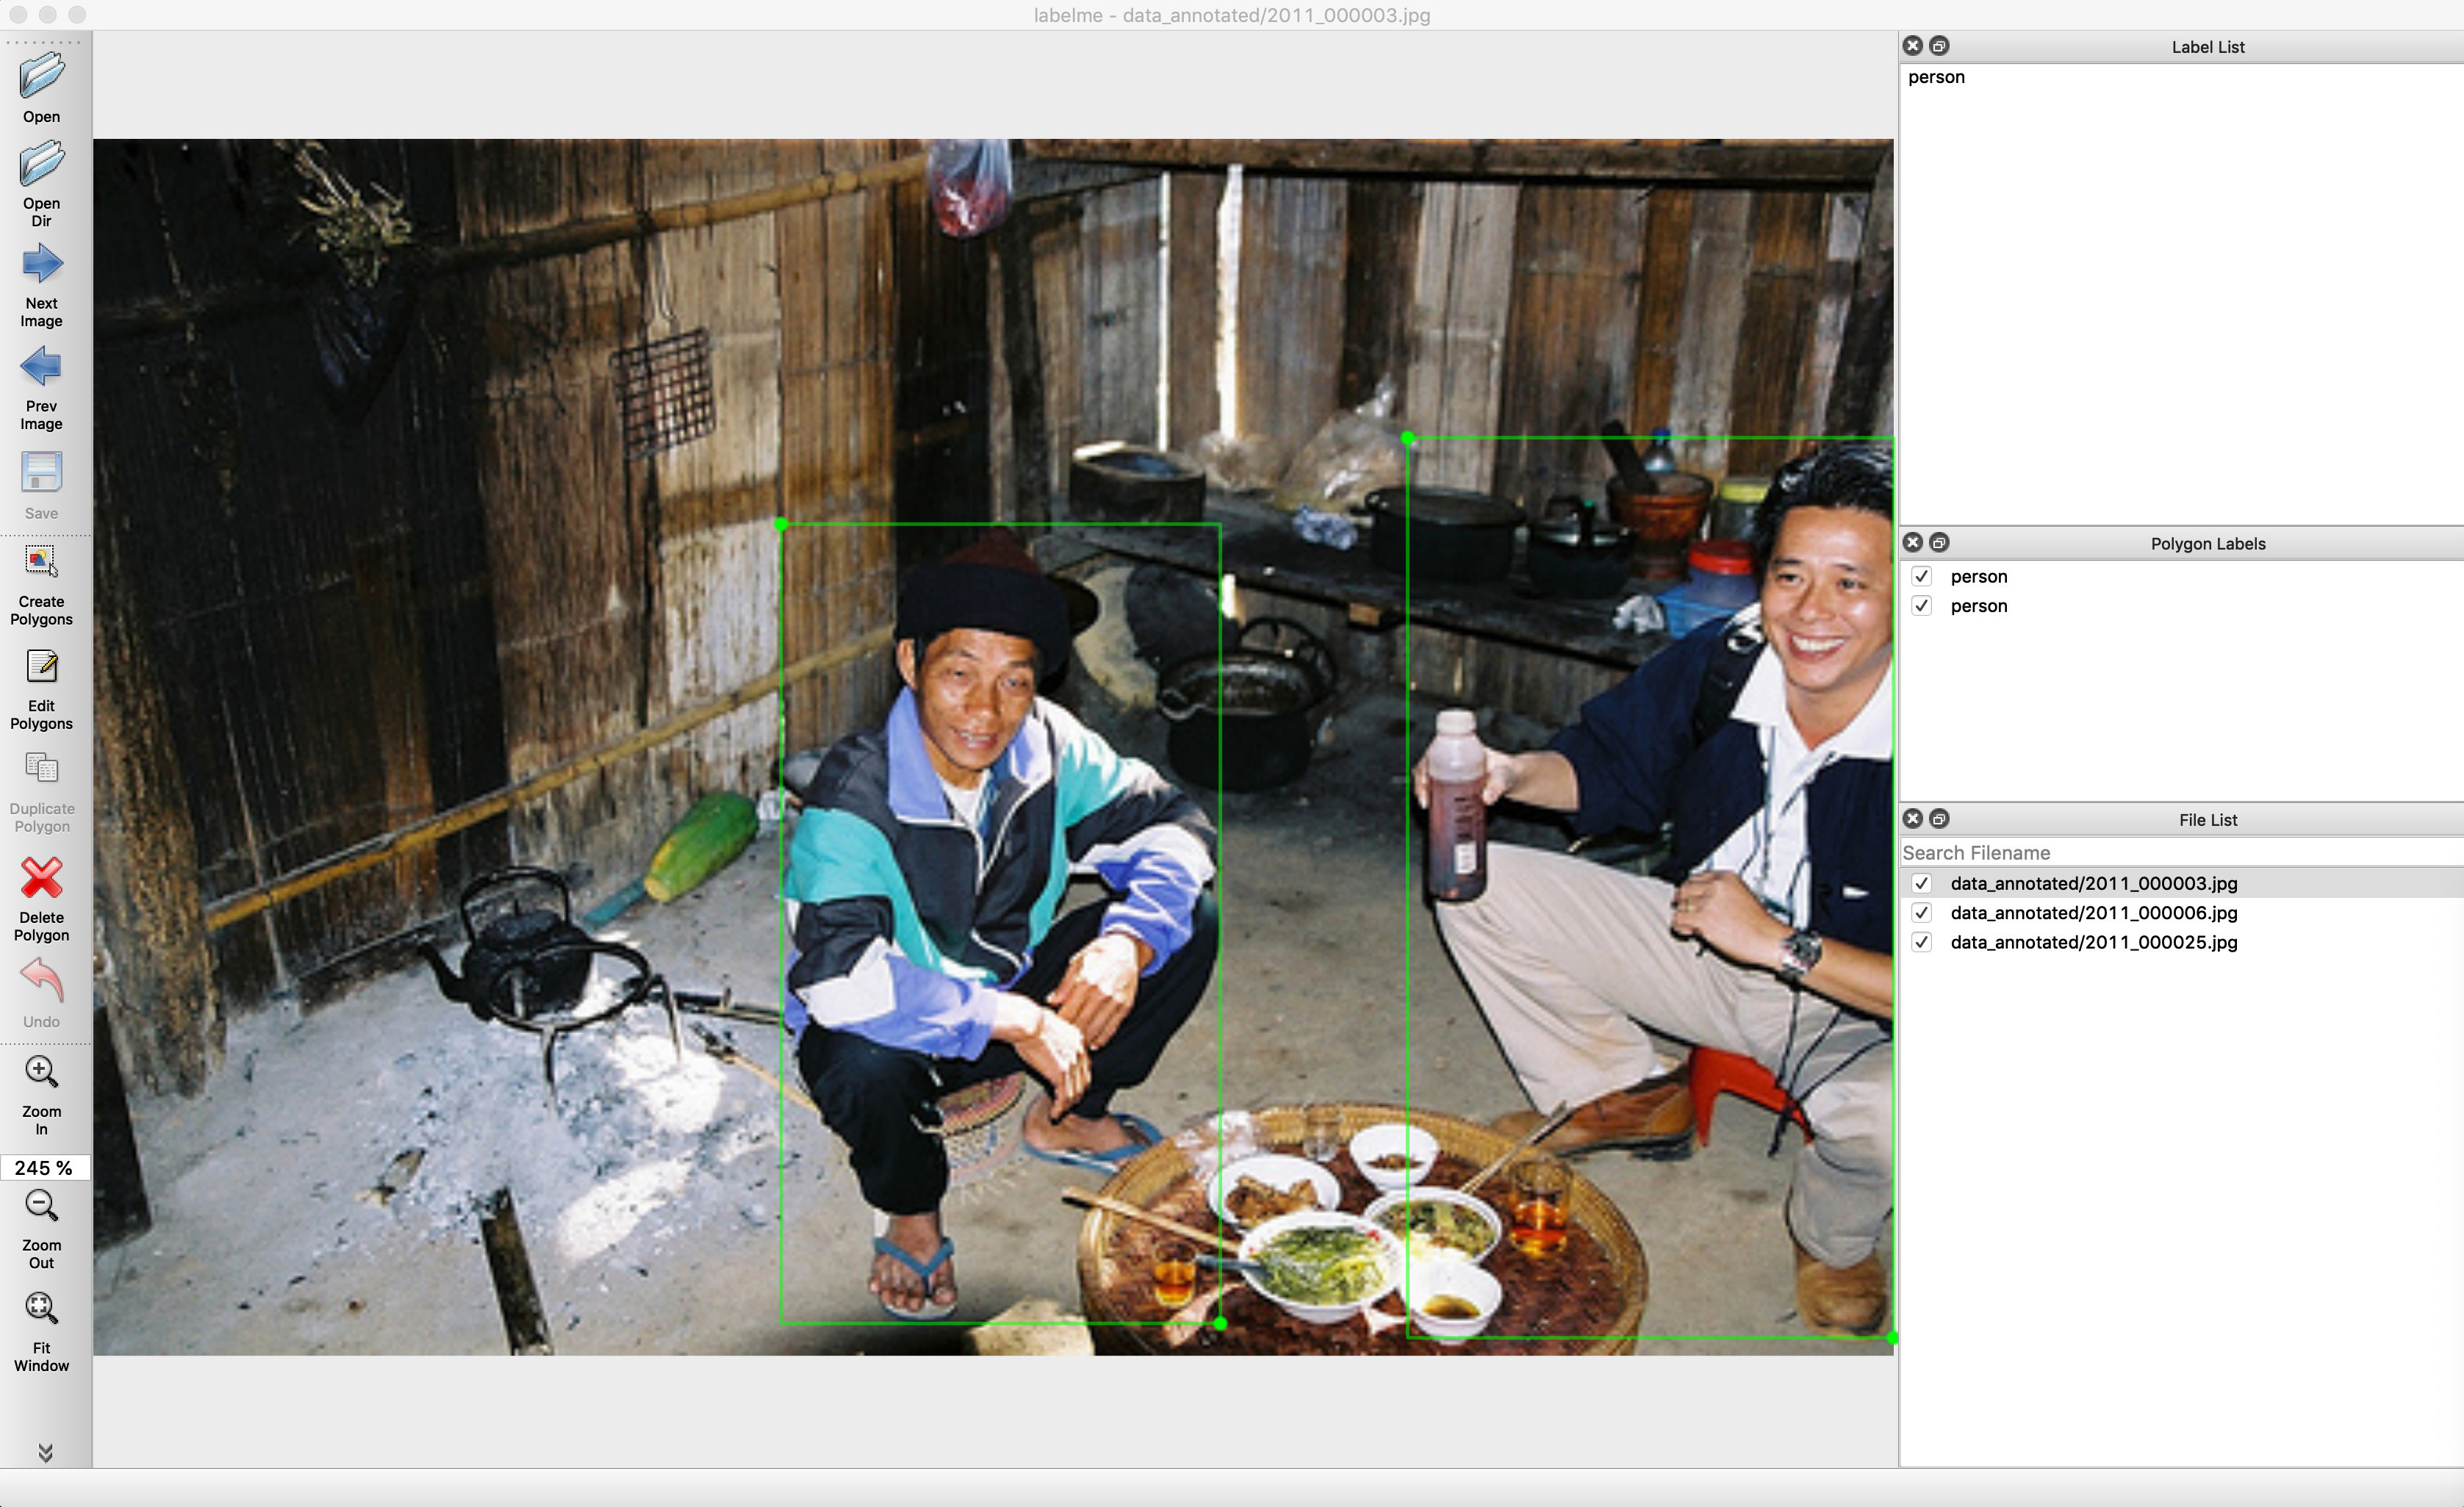
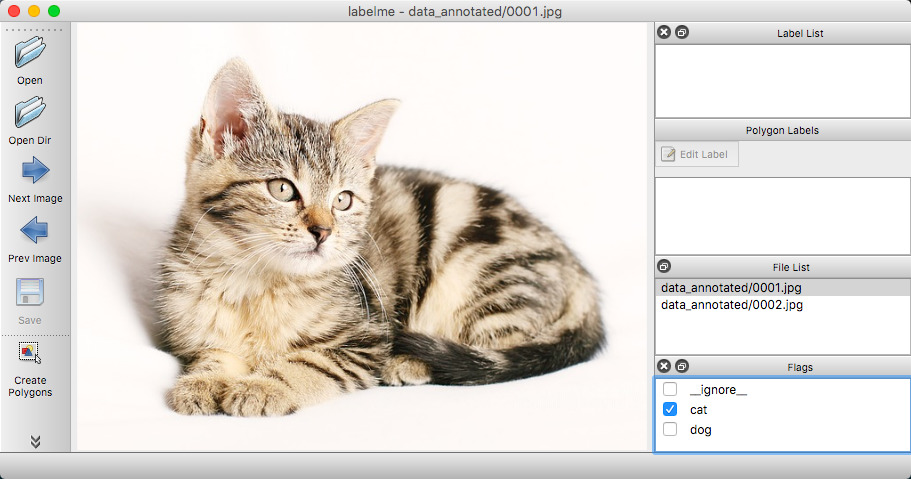 Fig 3. Other examples (semantic segmentation, bbox detection, and classification).


 Fig 4. Various primitives (polygon, rectangle, circle, line, and point).
## Features
- [x] Image annotation for polygon, rectangle, circle, line and point. ([tutorial](examples/tutorial))
- [x] Image flag annotation for classification and cleaning. ([#166](https://github.com/wkentaro/labelme/pull/166))
- [x] Video annotation. ([video annotation](examples/video_annotation))
- [x] GUI customization (predefined labels / flags, auto-saving, label validation, etc). ([#144](https://github.com/wkentaro/labelme/pull/144))
- [x] Exporting VOC-format dataset for semantic/instance segmentation. ([semantic segmentation](examples/semantic_segmentation), [instance segmentation](examples/instance_segmentation))
- [x] Exporting COCO-format dataset for instance segmentation. ([instance segmentation](examples/instance_segmentation))
## Requirements
- Ubuntu / macOS / Windows
- Python2 / Python3
- [PyQt4 / PyQt5](http://www.riverbankcomputing.co.uk/software/pyqt/intro) / [PySide2](https://wiki.qt.io/PySide2_GettingStarted)
## Installation
There are options:
- Platform agonistic installation: [Anaconda](#anaconda), [Docker](#docker)
- Platform specific installation: [Ubuntu](#ubuntu), [macOS](#macos), [Windows](#windows)
### Anaconda
You need install [Anaconda](https://www.continuum.io/downloads), then run below:
```bash
# python2
conda create --name=labelme python=2.7
source activate labelme
# conda install -c conda-forge pyside2
conda install pyqt
pip install labelme
# if you'd like to use the latest version. run below:
# pip install git+https://github.com/wkentaro/labelme.git
# python3
conda create --name=labelme python=3.6
source activate labelme
# conda install -c conda-forge pyside2
# conda install pyqt
pip install pyqt5 # pyqt5 can be installed via pip on python3
pip install labelme
```
### Docker
You need install [docker](https://www.docker.com), then run below:
```bash
wget https://raw.githubusercontent.com/wkentaro/labelme/master/labelme/cli/on_docker.py -O labelme_on_docker
chmod u+x labelme_on_docker
# Maybe you need http://sourabhbajaj.com/blog/2017/02/07/gui-applications-docker-mac/ on macOS
./labelme_on_docker examples/tutorial/apc2016_obj3.jpg -O examples/tutorial/apc2016_obj3.json
./labelme_on_docker examples/semantic_segmentation/data_annotated
```
### Ubuntu
```bash
# Ubuntu 14.04 / Ubuntu 16.04
# Python2
# sudo apt-get install python-qt4 # PyQt4
sudo apt-get install python-pyqt5 # PyQt5
sudo pip install labelme
# Python3
sudo apt-get install python3-pyqt5 # PyQt5
sudo pip3 install labelme
```
### macOS
```bash
# macOS Sierra
brew install pyqt # maybe pyqt5
pip install labelme # both python2/3 should work
# or install standalone executable / app
brew install wkentaro/labelme/labelme
brew cask install wkentaro/labelme/labelme
```
### Windows
Firstly, follow instruction in [Anaconda](#anaconda).
```bash
# Pillow 5 causes dll load error on Windows.
# https://github.com/wkentaro/labelme/pull/174
conda install pillow=4.0.0
```
## Usage
Run `labelme --help` for detail.
The annotations are saved as a [JSON](http://www.json.org/) file.
```bash
labelme # just open gui
# tutorial (single image example)
cd examples/tutorial
labelme apc2016_obj3.jpg # specify image file
labelme apc2016_obj3.jpg -O apc2016_obj3.json # close window after the save
labelme apc2016_obj3.jpg --nodata # not include image data but relative image path in JSON file
labelme apc2016_obj3.jpg \
--labels highland_6539_self_stick_notes,mead_index_cards,kong_air_dog_squeakair_tennis_ball # specify label list
# semantic segmentation example
cd examples/semantic_segmentation
labelme data_annotated/ # Open directory to annotate all images in it
labelme data_annotated/ --labels labels.txt # specify label list with a file
```
For more advanced usage, please refer to the examples:
* [Tutorial (Single Image Example)](examples/tutorial)
* [Semantic Segmentation Example](examples/semantic_segmentation)
* [Instance Segmentation Example](examples/instance_segmentation)
* [Video Annotation Example](examples/video_annotation)
## FAQ
- **How to convert JSON file to numpy array?** See [examples/tutorial](examples/tutorial#convert-to-dataset).
- **How to load label PNG file?** See [examples/tutorial](examples/tutorial#how-to-load-label-png-file).
- **How to get annotations for semantic segmentation?** See [examples/semantic_segmentation](examples/semantic_segmentation).
- **How to get annotations for instance segmentation?** See [examples/instance_segmentation](examples/instance_segmentation).
## Screencast
Fig 4. Various primitives (polygon, rectangle, circle, line, and point).
## Features
- [x] Image annotation for polygon, rectangle, circle, line and point. ([tutorial](examples/tutorial))
- [x] Image flag annotation for classification and cleaning. ([#166](https://github.com/wkentaro/labelme/pull/166))
- [x] Video annotation. ([video annotation](examples/video_annotation))
- [x] GUI customization (predefined labels / flags, auto-saving, label validation, etc). ([#144](https://github.com/wkentaro/labelme/pull/144))
- [x] Exporting VOC-format dataset for semantic/instance segmentation. ([semantic segmentation](examples/semantic_segmentation), [instance segmentation](examples/instance_segmentation))
- [x] Exporting COCO-format dataset for instance segmentation. ([instance segmentation](examples/instance_segmentation))
## Requirements
- Ubuntu / macOS / Windows
- Python2 / Python3
- [PyQt4 / PyQt5](http://www.riverbankcomputing.co.uk/software/pyqt/intro) / [PySide2](https://wiki.qt.io/PySide2_GettingStarted)
## Installation
There are options:
- Platform agonistic installation: [Anaconda](#anaconda), [Docker](#docker)
- Platform specific installation: [Ubuntu](#ubuntu), [macOS](#macos), [Windows](#windows)
### Anaconda
You need install [Anaconda](https://www.continuum.io/downloads), then run below:
```bash
# python2
conda create --name=labelme python=2.7
source activate labelme
# conda install -c conda-forge pyside2
conda install pyqt
pip install labelme
# if you'd like to use the latest version. run below:
# pip install git+https://github.com/wkentaro/labelme.git
# python3
conda create --name=labelme python=3.6
source activate labelme
# conda install -c conda-forge pyside2
# conda install pyqt
pip install pyqt5 # pyqt5 can be installed via pip on python3
pip install labelme
```
### Docker
You need install [docker](https://www.docker.com), then run below:
```bash
wget https://raw.githubusercontent.com/wkentaro/labelme/master/labelme/cli/on_docker.py -O labelme_on_docker
chmod u+x labelme_on_docker
# Maybe you need http://sourabhbajaj.com/blog/2017/02/07/gui-applications-docker-mac/ on macOS
./labelme_on_docker examples/tutorial/apc2016_obj3.jpg -O examples/tutorial/apc2016_obj3.json
./labelme_on_docker examples/semantic_segmentation/data_annotated
```
### Ubuntu
```bash
# Ubuntu 14.04 / Ubuntu 16.04
# Python2
# sudo apt-get install python-qt4 # PyQt4
sudo apt-get install python-pyqt5 # PyQt5
sudo pip install labelme
# Python3
sudo apt-get install python3-pyqt5 # PyQt5
sudo pip3 install labelme
```
### macOS
```bash
# macOS Sierra
brew install pyqt # maybe pyqt5
pip install labelme # both python2/3 should work
# or install standalone executable / app
brew install wkentaro/labelme/labelme
brew cask install wkentaro/labelme/labelme
```
### Windows
Firstly, follow instruction in [Anaconda](#anaconda).
```bash
# Pillow 5 causes dll load error on Windows.
# https://github.com/wkentaro/labelme/pull/174
conda install pillow=4.0.0
```
## Usage
Run `labelme --help` for detail.
The annotations are saved as a [JSON](http://www.json.org/) file.
```bash
labelme # just open gui
# tutorial (single image example)
cd examples/tutorial
labelme apc2016_obj3.jpg # specify image file
labelme apc2016_obj3.jpg -O apc2016_obj3.json # close window after the save
labelme apc2016_obj3.jpg --nodata # not include image data but relative image path in JSON file
labelme apc2016_obj3.jpg \
--labels highland_6539_self_stick_notes,mead_index_cards,kong_air_dog_squeakair_tennis_ball # specify label list
# semantic segmentation example
cd examples/semantic_segmentation
labelme data_annotated/ # Open directory to annotate all images in it
labelme data_annotated/ --labels labels.txt # specify label list with a file
```
For more advanced usage, please refer to the examples:
* [Tutorial (Single Image Example)](examples/tutorial)
* [Semantic Segmentation Example](examples/semantic_segmentation)
* [Instance Segmentation Example](examples/instance_segmentation)
* [Video Annotation Example](examples/video_annotation)
## FAQ
- **How to convert JSON file to numpy array?** See [examples/tutorial](examples/tutorial#convert-to-dataset).
- **How to load label PNG file?** See [examples/tutorial](examples/tutorial#how-to-load-label-png-file).
- **How to get annotations for semantic segmentation?** See [examples/semantic_segmentation](examples/semantic_segmentation).
- **How to get annotations for instance segmentation?** See [examples/instance_segmentation](examples/instance_segmentation).
## Screencast
 ## Testing
```bash
pip install hacking pytest pytest-qt
flake8 .
pytest -v tests
```
## Developing
```bash
git clone https://github.com/wkentaro/labelme.git
cd labelme
# Install anaconda3 and labelme
curl -L https://github.com/wkentaro/dotfiles/raw/master/local/bin/install_anaconda3.sh | bash -s .
source .anaconda3/bin/activate
pip install -e .
```
## How to build standalone executable
Below shows how to build the standalone executable on macOS, Linux and Windows.
Also, there are pre-built executables in
[the release section](https://github.com/wkentaro/labelme/releases).
```bash
# Setup conda
conda create --name labelme python==3.6.0
conda activate labelme
# Build the standalone executable
pip install .
pip install pyinstaller
pyinstaller labelme.spec
dist/labelme --version
```
## Acknowledgement
This repo is the fork of [mpitid/pylabelme](https://github.com/mpitid/pylabelme),
whose development has already stopped.
## Testing
```bash
pip install hacking pytest pytest-qt
flake8 .
pytest -v tests
```
## Developing
```bash
git clone https://github.com/wkentaro/labelme.git
cd labelme
# Install anaconda3 and labelme
curl -L https://github.com/wkentaro/dotfiles/raw/master/local/bin/install_anaconda3.sh | bash -s .
source .anaconda3/bin/activate
pip install -e .
```
## How to build standalone executable
Below shows how to build the standalone executable on macOS, Linux and Windows.
Also, there are pre-built executables in
[the release section](https://github.com/wkentaro/labelme/releases).
```bash
# Setup conda
conda create --name labelme python==3.6.0
conda activate labelme
# Build the standalone executable
pip install .
pip install pyinstaller
pyinstaller labelme.spec
dist/labelme --version
```
## Acknowledgement
This repo is the fork of [mpitid/pylabelme](https://github.com/mpitid/pylabelme),
whose development has already stopped.