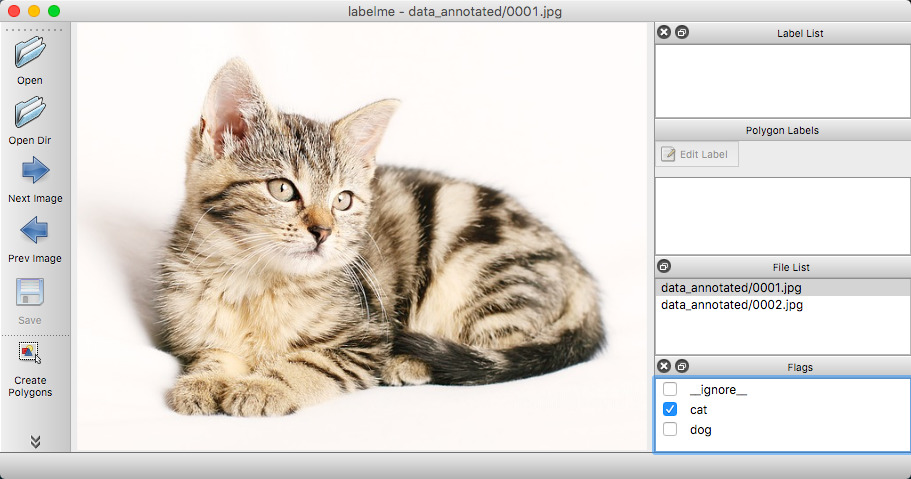
labelme


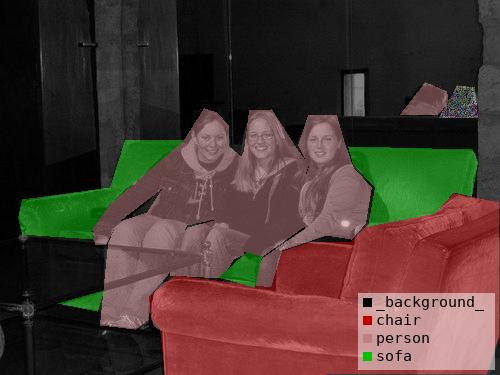

 VOC dataset example of instance segmentation.


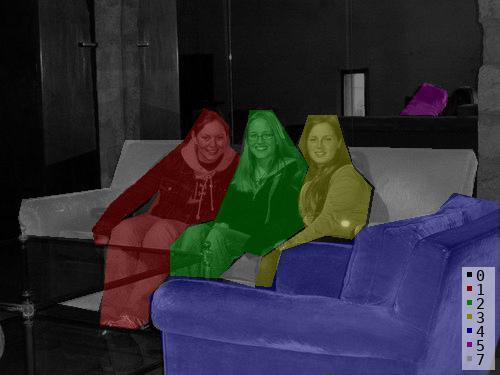
 Other examples (semantic segmentation, bbox detection, and classification).


 Various primitives (polygon, rectangle, circle, line, and point).
## Features
- [x] Image annotation for polygon, rectangle, circle, line and point. ([tutorial](examples/tutorial))
- [x] Image flag annotation for classification and cleaning. ([#166](https://github.com/wkentaro/labelme/pull/166))
- [x] Video annotation. ([video annotation](examples/video_annotation))
- [x] GUI customization (predefined labels / flags, auto-saving, label validation, etc). ([#144](https://github.com/wkentaro/labelme/pull/144))
- [x] Exporting VOC-format dataset for semantic/instance segmentation. ([semantic segmentation](examples/semantic_segmentation), [instance segmentation](examples/instance_segmentation))
- [x] Exporting COCO-format dataset for instance segmentation. ([instance segmentation](examples/instance_segmentation))
## Starter Bundle
If you're new to Labelme, you can get started with [Labelme Starter Bundle](https://labelme.gumroad.com/l/starter-bundle) (FREE), which contains:
- **Installation guides** for all platforms: Windows, macOS, and Linux 💻
- **Step-by-step tutorials**: first annotation to editing, exporting, and integrating with other programs 📕
- **A compilation of valuable resources** for further exploration 🔗.
## Installation
There are options:
- Platform agnostic installation: [Anaconda](#anaconda)
- Platform specific installation: [Ubuntu](#ubuntu), [macOS](#macos), [Windows](#windows)
- Pre-build binaries from [the release section](https://github.com/wkentaro/labelme/releases)
### Anaconda
You need install [Anaconda](https://www.continuum.io/downloads), then run below:
```bash
# python3
conda create --name=labelme python=3
source activate labelme
# conda install -c conda-forge pyside2
# conda install pyqt
# pip install pyqt5 # pyqt5 can be installed via pip on python3
pip install labelme
# or you can install everything by conda command
# conda install labelme -c conda-forge
```
### Ubuntu
```bash
sudo apt-get install labelme
# or
sudo pip3 install labelme
# or install standalone executable from:
# https://github.com/wkentaro/labelme/releases
```
### macOS
```bash
brew install pyqt # maybe pyqt5
pip install labelme
# or
brew install wkentaro/labelme/labelme # command line interface
# brew install --cask wkentaro/labelme/labelme # app
# or install standalone executable/app from:
# https://github.com/wkentaro/labelme/releases
```
### Windows
Install [Anaconda](https://www.continuum.io/downloads), then in an Anaconda Prompt run:
```bash
conda create --name=labelme python=3
conda activate labelme
pip install labelme
# or install standalone executable/app from:
# https://github.com/wkentaro/labelme/releases
```
## Usage
Run `labelme --help` for detail.
The annotations are saved as a [JSON](http://www.json.org/) file.
```bash
labelme # just open gui
# tutorial (single image example)
cd examples/tutorial
labelme apc2016_obj3.jpg # specify image file
labelme apc2016_obj3.jpg -O apc2016_obj3.json # close window after the save
labelme apc2016_obj3.jpg --nodata # not include image data but relative image path in JSON file
labelme apc2016_obj3.jpg \
--labels highland_6539_self_stick_notes,mead_index_cards,kong_air_dog_squeakair_tennis_ball # specify label list
# semantic segmentation example
cd examples/semantic_segmentation
labelme data_annotated/ # Open directory to annotate all images in it
labelme data_annotated/ --labels labels.txt # specify label list with a file
```
### Command Line Arguments
- `--output` specifies the location that annotations will be written to. If the location ends with .json, a single annotation will be written to this file. Only one image can be annotated if a location is specified with .json. If the location does not end with .json, the program will assume it is a directory. Annotations will be stored in this directory with a name that corresponds to the image that the annotation was made on.
- The first time you run labelme, it will create a config file in `~/.labelmerc`. You can edit this file and the changes will be applied the next time that you launch labelme. If you would prefer to use a config file from another location, you can specify this file with the `--config` flag.
- Without the `--nosortlabels` flag, the program will list labels in alphabetical order. When the program is run with this flag, it will display labels in the order that they are provided.
- Flags are assigned to an entire image. [Example](examples/classification)
- Labels are assigned to a single polygon. [Example](examples/bbox_detection)
### FAQ
- **How to convert JSON file to numpy array?** See [examples/tutorial](examples/tutorial#convert-to-dataset).
- **How to load label PNG file?** See [examples/tutorial](examples/tutorial#how-to-load-label-png-file).
- **How to get annotations for semantic segmentation?** See [examples/semantic_segmentation](examples/semantic_segmentation).
- **How to get annotations for instance segmentation?** See [examples/instance_segmentation](examples/instance_segmentation).
## Examples
### Dataset examples
* [Object Detection Dataset](https://labelme.gumroad.com/l/object-detection-dataset): 20 object categories and 1.7K images
### Annotation examples
A few object categories and images:
* [Image Classification](examples/image_classification)
* [Bounding Box Detection](examples/bbox_detection)
* [Semantic Segmentation](examples/semantic_segmentation)
* [Instance Segmentation](examples/instance_segmentation)
* [Video Annotation](examples/video_annotation)
## How to develop
```bash
git clone https://github.com/wkentaro/labelme.git
cd labelme
# Install anaconda3 and labelme
curl -L https://github.com/wkentaro/dotfiles/raw/main/local/bin/install_anaconda3.sh | bash -s .
source .anaconda3/bin/activate
pip install -e .
```
### How to build standalone executable
Below shows how to build the standalone executable on macOS, Linux and Windows.
```bash
# Setup conda
conda create --name labelme python=3.9
conda activate labelme
# Build the standalone executable
pip install .
pip install 'matplotlib<3.3'
pip install pyinstaller
pyinstaller labelme.spec
dist/labelme --version
```
### How to contribute
Make sure below test passes on your environment.
See `.github/workflows/ci.yml` for more detail.
```bash
pip install -r requirements-dev.txt
ruff format --check # `ruff format` to auto-fix
ruff check # `ruff check --fix` to auto-fix
MPLBACKEND='agg' pytest -vsx tests/
```
## Acknowledgement
This repo is the fork of [mpitid/pylabelme](https://github.com/mpitid/pylabelme).
Various primitives (polygon, rectangle, circle, line, and point).
## Features
- [x] Image annotation for polygon, rectangle, circle, line and point. ([tutorial](examples/tutorial))
- [x] Image flag annotation for classification and cleaning. ([#166](https://github.com/wkentaro/labelme/pull/166))
- [x] Video annotation. ([video annotation](examples/video_annotation))
- [x] GUI customization (predefined labels / flags, auto-saving, label validation, etc). ([#144](https://github.com/wkentaro/labelme/pull/144))
- [x] Exporting VOC-format dataset for semantic/instance segmentation. ([semantic segmentation](examples/semantic_segmentation), [instance segmentation](examples/instance_segmentation))
- [x] Exporting COCO-format dataset for instance segmentation. ([instance segmentation](examples/instance_segmentation))
## Starter Bundle
If you're new to Labelme, you can get started with [Labelme Starter Bundle](https://labelme.gumroad.com/l/starter-bundle) (FREE), which contains:
- **Installation guides** for all platforms: Windows, macOS, and Linux 💻
- **Step-by-step tutorials**: first annotation to editing, exporting, and integrating with other programs 📕
- **A compilation of valuable resources** for further exploration 🔗.
## Installation
There are options:
- Platform agnostic installation: [Anaconda](#anaconda)
- Platform specific installation: [Ubuntu](#ubuntu), [macOS](#macos), [Windows](#windows)
- Pre-build binaries from [the release section](https://github.com/wkentaro/labelme/releases)
### Anaconda
You need install [Anaconda](https://www.continuum.io/downloads), then run below:
```bash
# python3
conda create --name=labelme python=3
source activate labelme
# conda install -c conda-forge pyside2
# conda install pyqt
# pip install pyqt5 # pyqt5 can be installed via pip on python3
pip install labelme
# or you can install everything by conda command
# conda install labelme -c conda-forge
```
### Ubuntu
```bash
sudo apt-get install labelme
# or
sudo pip3 install labelme
# or install standalone executable from:
# https://github.com/wkentaro/labelme/releases
```
### macOS
```bash
brew install pyqt # maybe pyqt5
pip install labelme
# or
brew install wkentaro/labelme/labelme # command line interface
# brew install --cask wkentaro/labelme/labelme # app
# or install standalone executable/app from:
# https://github.com/wkentaro/labelme/releases
```
### Windows
Install [Anaconda](https://www.continuum.io/downloads), then in an Anaconda Prompt run:
```bash
conda create --name=labelme python=3
conda activate labelme
pip install labelme
# or install standalone executable/app from:
# https://github.com/wkentaro/labelme/releases
```
## Usage
Run `labelme --help` for detail.
The annotations are saved as a [JSON](http://www.json.org/) file.
```bash
labelme # just open gui
# tutorial (single image example)
cd examples/tutorial
labelme apc2016_obj3.jpg # specify image file
labelme apc2016_obj3.jpg -O apc2016_obj3.json # close window after the save
labelme apc2016_obj3.jpg --nodata # not include image data but relative image path in JSON file
labelme apc2016_obj3.jpg \
--labels highland_6539_self_stick_notes,mead_index_cards,kong_air_dog_squeakair_tennis_ball # specify label list
# semantic segmentation example
cd examples/semantic_segmentation
labelme data_annotated/ # Open directory to annotate all images in it
labelme data_annotated/ --labels labels.txt # specify label list with a file
```
### Command Line Arguments
- `--output` specifies the location that annotations will be written to. If the location ends with .json, a single annotation will be written to this file. Only one image can be annotated if a location is specified with .json. If the location does not end with .json, the program will assume it is a directory. Annotations will be stored in this directory with a name that corresponds to the image that the annotation was made on.
- The first time you run labelme, it will create a config file in `~/.labelmerc`. You can edit this file and the changes will be applied the next time that you launch labelme. If you would prefer to use a config file from another location, you can specify this file with the `--config` flag.
- Without the `--nosortlabels` flag, the program will list labels in alphabetical order. When the program is run with this flag, it will display labels in the order that they are provided.
- Flags are assigned to an entire image. [Example](examples/classification)
- Labels are assigned to a single polygon. [Example](examples/bbox_detection)
### FAQ
- **How to convert JSON file to numpy array?** See [examples/tutorial](examples/tutorial#convert-to-dataset).
- **How to load label PNG file?** See [examples/tutorial](examples/tutorial#how-to-load-label-png-file).
- **How to get annotations for semantic segmentation?** See [examples/semantic_segmentation](examples/semantic_segmentation).
- **How to get annotations for instance segmentation?** See [examples/instance_segmentation](examples/instance_segmentation).
## Examples
### Dataset examples
* [Object Detection Dataset](https://labelme.gumroad.com/l/object-detection-dataset): 20 object categories and 1.7K images
### Annotation examples
A few object categories and images:
* [Image Classification](examples/image_classification)
* [Bounding Box Detection](examples/bbox_detection)
* [Semantic Segmentation](examples/semantic_segmentation)
* [Instance Segmentation](examples/instance_segmentation)
* [Video Annotation](examples/video_annotation)
## How to develop
```bash
git clone https://github.com/wkentaro/labelme.git
cd labelme
# Install anaconda3 and labelme
curl -L https://github.com/wkentaro/dotfiles/raw/main/local/bin/install_anaconda3.sh | bash -s .
source .anaconda3/bin/activate
pip install -e .
```
### How to build standalone executable
Below shows how to build the standalone executable on macOS, Linux and Windows.
```bash
# Setup conda
conda create --name labelme python=3.9
conda activate labelme
# Build the standalone executable
pip install .
pip install 'matplotlib<3.3'
pip install pyinstaller
pyinstaller labelme.spec
dist/labelme --version
```
### How to contribute
Make sure below test passes on your environment.
See `.github/workflows/ci.yml` for more detail.
```bash
pip install -r requirements-dev.txt
ruff format --check # `ruff format` to auto-fix
ruff check # `ruff check --fix` to auto-fix
MPLBACKEND='agg' pytest -vsx tests/
```
## Acknowledgement
This repo is the fork of [mpitid/pylabelme](https://github.com/mpitid/pylabelme).